Follow Us!

***New Here? We would love to have you back! Don't forget to become a follower so you don't miss any fun new posts!***

Friday, March 16, 2012

Introducing my super fantastic awesome SISTER!


Hello! I would like to take a moment to introduce you to my fantastic sister! She currently has her own blog @ waughtivebeenupto. We have both had a hard time posting as frequently as we want to. And it often seems when one of us is posting a lot the other isn't. So we have decided to blog together! She is going to leave her blog and join mine. I am super excited about this! We should have just done it from the beginning. We haven't always shared a lot of the same interests however recently it seems we have ALL of the same interests! So blogging together and doing more projects together is going to be really fun. I am hoping it also keeps us motivated to get a lot of projects done. We will be signing the end of our posts so you can keep us straight.

I am also hoping to get an "about us" tab up soon so we can both have a profile posted about ourselves. I am also working on adding a buttons to follow both of us on pinterest. Coming soon I promise!!

One of the blogs that we are both inspired by is eighteen25. It is managed by three sisters and we think they are pretty great!

I hope you enjoy having my sister around here! I know I will. She is pretty awesome. =)Thanks for stopping by!!

Thursday, March 1, 2012

How to: Thread a Brother 1034D Serger

I am so excited to finally be able to share that I have used my serger! I bought it back in November but hadn't had a chance to put it to use because I have been so busy and to be honest I was pretty intimidated. I started out reading the entire manual that came with it and I still had no idea how to even thread the thing. So I quickly googled it like I do with many things. And I stumbled across this EXTREMELY helpful video on youtube.


I hope this is helpful to anyone else that may be struggling. I will be post more tutorials on how to use this amazing little machine as I complete them! As always thanks for stopping by and be sure to leave a comment or question if you have one! 

Did you find this post helpful or interesting? You should follow my blog so you don't miss any fun posts in the future!


Wednesday, February 29, 2012

Slow Cooker: Chicken & Dumplings

Happy Hump Day. I can't wait for the weekend to get here! We have some seriously fun plans this weekend. Including going to look at a house. I really hope it works out.

I have a seriously love of comfort food. I am pretty sure I could eat mashed potatoes every day of my life...but then again who couldnt!? So when I saw a recipe on pinterest for slow cooker chicken and dumplings I knew I had to try it. My inspiration came from this post on polishthestars.com. I followed a good portion of her ingredients and directions but I made some of my own changes.

Slow Cooker: Chicken & Dumplings


Ingredients
-1 lb boneless skinless chicken breast (About 3 breasts)
2 Tablespoons Unsalted Butter
2 cans (10.5oz) Condensed Cream of Chicken Soup (I used fat free)
1 can (14oz) Chicken Broth OR
(1 C water and 2 frozen chicken broth cups. See how to make those here.)
1/2 medium White Onion, diced
4 Large Flaky Refrigerator Biscuits (half a can)
1. Place thawed chicken in crock pot and top with butter.  Add cream of chicken soup, chicken broth and diced onions.  Cook on Low for 8 hours (I never cook anything for very long on high in my crock pot because I have never had good luck with it. Everything seems to dry out.)  Now walk away and do not stir while cooking.
2. Cut each uncooked biscuit into 9 small pieces and stir into the chicken/soup mixture.  Continue to cook on High for 45 minutes (or until biscuits look smooth and doughy like dumplings).  Remove chicken from slow-cooker and shred with a fork.  Return to slow-cooker and stir everything together.  Serve hot.
Makes about 4-6 servings.

Tuesday, February 28, 2012

Easy Peezy Homemade Febreze-y

Gotta love that cheesy title. =) This weekend I made some homemade febreze and it was super easy and... IT WORKS! It was also really cheap. I'm not sure exactly how much it cost me but I'd be willing to bet it was just a few pennies. I found the idea on pinterest which led me to this post on fakeitfrugal.

This literally took me about 20 seconds to make and it was totally worth it. What a great money saver!


Supplies
-An empty febreze bottle or any empty spray bottle
-2 t baking soda
-1/8 C fabric softener

Directions
Combine fabric softener and baking soda, mix well. (I would recommend using a glass or stainless steel measuring cup for this. Plastic may absorb the smell of the fabric softener.) Pour into empty spray bottle and fill the rest of the way with hot tap water. Place lid on bottle and shake well. Now spray and refresh your home! So easy. =)

Did you enjoy this post? Be sure to become a follower so you don't miss any posts!

Thanks for stopping by! Leave any questions in the comments section and I will get back to you ASAP.

Linking up to todayscreativeblog and 
Tip Junkie handmade projects

Wednesday, February 22, 2012

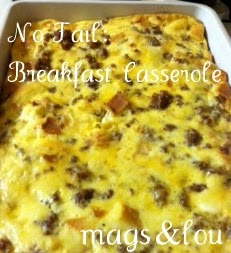
No Fail: Breakfast Casserole

Hello! Happy Wednesday. We just finished one of our all time favorite meals. Delicious sausage and egg breakfast casserole. This is a recipe my family has used for years. I remember my mom making it for Christmas every year. =) It is really easy and quick, plus you can make it the night before! I love when I come home from work and all I have to do is stick something in the oven. So here is the recipe....I hope you enjoy it!

Sausage & Egg Breakfast Casserole


Ingredients
-1 lb pork sausage (I like bob evans)
-8 eggs
-2 1/2 cups milk
-1 t salt
-1 t ground mustard
-6 slices white bread, cut into 1/2 inch cubes
-1 1/2 cups shredded cheddar cheese

Directions
1. In a skillet brown and crumble sausage; drain and set aside.

2. In a large bowl, beat eggs; add milk, salt and mustard. Stir in bread cubes, cheese and sausage.

3. Pour into grease 13x9 inch baking dish.

4. Cover and refrigerate for 8 hours or overnight.

5. Remore 20-30 minutes before baking. Bake uncovered @ 350 degrees F for 45-50 minutes or until knife inserted near center comes out clean.

I like to serve with a fresh fruit salad. Thanks for stopping by! And as always please feel free to leave any questions in the comments section and I will get back to you ASAP.

Click Here to print this recipe!