Follow Us!

***New Here? We would love to have you back! Don't forget to become a follower so you don't miss any fun new posts!***

Wednesday, February 29, 2012

Slow Cooker: Chicken & Dumplings

Happy Hump Day. I can't wait for the weekend to get here! We have some seriously fun plans this weekend. Including going to look at a house. I really hope it works out.

I have a seriously love of comfort food. I am pretty sure I could eat mashed potatoes every day of my life...but then again who couldnt!? So when I saw a recipe on pinterest for slow cooker chicken and dumplings I knew I had to try it. My inspiration came from this post on polishthestars.com. I followed a good portion of her ingredients and directions but I made some of my own changes.

Slow Cooker: Chicken & Dumplings


Ingredients
-1 lb boneless skinless chicken breast (About 3 breasts)
2 Tablespoons Unsalted Butter
2 cans (10.5oz) Condensed Cream of Chicken Soup (I used fat free)
1 can (14oz) Chicken Broth OR
(1 C water and 2 frozen chicken broth cups. See how to make those here.)
1/2 medium White Onion, diced
4 Large Flaky Refrigerator Biscuits (half a can)
1. Place thawed chicken in crock pot and top with butter.  Add cream of chicken soup, chicken broth and diced onions.  Cook on Low for 8 hours (I never cook anything for very long on high in my crock pot because I have never had good luck with it. Everything seems to dry out.)  Now walk away and do not stir while cooking.
2. Cut each uncooked biscuit into 9 small pieces and stir into the chicken/soup mixture.  Continue to cook on High for 45 minutes (or until biscuits look smooth and doughy like dumplings).  Remove chicken from slow-cooker and shred with a fork.  Return to slow-cooker and stir everything together.  Serve hot.
Makes about 4-6 servings.

Tuesday, February 28, 2012

Easy Peezy Homemade Febreze-y

Gotta love that cheesy title. =) This weekend I made some homemade febreze and it was super easy and... IT WORKS! It was also really cheap. I'm not sure exactly how much it cost me but I'd be willing to bet it was just a few pennies. I found the idea on pinterest which led me to this post on fakeitfrugal.

This literally took me about 20 seconds to make and it was totally worth it. What a great money saver!


Supplies
-An empty febreze bottle or any empty spray bottle
-2 t baking soda
-1/8 C fabric softener

Directions
Combine fabric softener and baking soda, mix well. (I would recommend using a glass or stainless steel measuring cup for this. Plastic may absorb the smell of the fabric softener.) Pour into empty spray bottle and fill the rest of the way with hot tap water. Place lid on bottle and shake well. Now spray and refresh your home! So easy. =)

Did you enjoy this post? Be sure to become a follower so you don't miss any posts!

Thanks for stopping by! Leave any questions in the comments section and I will get back to you ASAP.

Linking up to todayscreativeblog and 
Tip Junkie handmade projects

Wednesday, February 22, 2012

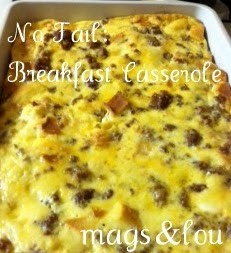
No Fail: Breakfast Casserole

Hello! Happy Wednesday. We just finished one of our all time favorite meals. Delicious sausage and egg breakfast casserole. This is a recipe my family has used for years. I remember my mom making it for Christmas every year. =) It is really easy and quick, plus you can make it the night before! I love when I come home from work and all I have to do is stick something in the oven. So here is the recipe....I hope you enjoy it!

Sausage & Egg Breakfast Casserole


Ingredients
-1 lb pork sausage (I like bob evans)
-8 eggs
-2 1/2 cups milk
-1 t salt
-1 t ground mustard
-6 slices white bread, cut into 1/2 inch cubes
-1 1/2 cups shredded cheddar cheese

Directions
1. In a skillet brown and crumble sausage; drain and set aside.

2. In a large bowl, beat eggs; add milk, salt and mustard. Stir in bread cubes, cheese and sausage.

3. Pour into grease 13x9 inch baking dish.

4. Cover and refrigerate for 8 hours or overnight.

5. Remore 20-30 minutes before baking. Bake uncovered @ 350 degrees F for 45-50 minutes or until knife inserted near center comes out clean.

I like to serve with a fresh fruit salad. Thanks for stopping by! And as always please feel free to leave any questions in the comments section and I will get back to you ASAP.

Click Here to print this recipe!

Sunday, February 12, 2012

February Pinterest Challenge


Hi there. I am keeping it simple this month because we have soo much going on. So I am trying to be realistic for once. haha  So here is my pinspiration....


Homemade Bread
Pinned Image

I have always wanted to make bread from scratch but I have been intimidated by the idea of baking with yeast. But I finally decided to go for it! So here are my results! I must say I am very pleased with my results and with practice I think I will only get better at the whole process.


Here is my bread cooling.

I used this tutorial (via lafujimama) to get the technique done and to get a good visual. I highly recommend checking it out and watching her video!

I used the follow recipe originally from allrecipes.com adapted slightly to suite what I had on hand.

Homemade White Bread
Ingredients
  • 2 packages active dry yeast
  • 3 T granulated sugar
  • 2 1/2 C warm water (110 degrees F / 45 degrees C)
  • 3 T butter (softened)
  • 1 T salt
  • 6 1/2 C all-purpose flour (or Bread Flour)
*Most recipes recommend bread flour however I did not have any on hand and I read all-purpose would work ok. Next time I will plan ahead and buy bread flour to see if there is a difference.

Directions

  1. In a large bowl, dissolve yeast and sugar in warm water.  Stir in butter, salt and two cups of the flour. (Transfer to a stand mixer at this point if you have one and use your dough hook) Stir in the remaining flour, 1/2 cup at a time, beating well after each addition. When the dough has pulled together, turn it out onto a lightly floured surface and knead until smooth and elastic, about 8 minutes.
  2. Lightly oil a large bowl, place the dough in the bowl and turn to coat with oil. Cover with a cloth and let rise in a warm place until doubled in volume, about 1 hour.
  3. Deflate the dough and turn it out onto a lightly floured surface. Divide the dough into two equal pieces and form into loaves. Place the loaves into two lightly greased 9x5 inch loaf pans. Cover the loaves with a damp cloth and let rise until doubled in volume, about 40 minutes.
  4. Bake at 375 degrees F (190 degrees C) for about 30 minutes or until the top is golden brown and the bottom of the loaf sounds hollow when tapped.
Click Here to print the Homemade White Bread recipe!

*I made cookies while I was waiting for the bread to rise so the kitchen would be nice and warm. You can find my Chocolate Chip Cookie recipe here! 

And here is the final product pre-sliced and ready to enjoy!


I had some peanut butter toast for breakfast and it was delicious. Light soft middle with just a little crunch to the crust. I would say this was a definite success. I am looking forward to trying some more complex bread recipes in the future. I will certainly be looking for some healthier options. Have you ever made your own bread?

Thanks for stopping by! As always leave me a comment if you have any questions!


Keepin it Real!


Okay so I am just going to keep it real and come forward with my January pinterest challenge results. Remember back in January when I confidently posted this as my pinterest challenge project....


Pinned Image

Well from now on I will not be announcing my project until it has been completed I will simply post my before pinspiration and then my after result all in one post. Because as it turns out my husband and I are very blessed to have large families and lots of friends.....resulting in a stack on wedding cards (just wedding not shower) that is a whopping 3 1/2" tall! So needless to say this project is not really possible for me to make. I am however planning to do something with them at a later date, maybe a cute box or something?


So in true 'Keepin It Real' fashion here is our ginormous stack of wedding cards! Aren't we lucky. I guess when I picked this project I had forgotten just how big our wedding was.


Thanks for stopping by! And sorry my first pinterest project was a BIG FAT FAIL! haha

Saturday, February 4, 2012

Big Announcement.

Pinned Image

                                          via pinterest


Hello my faithful 8 followers! haha. Last week we found out Dan was getting a promotion! Yippee! We didn't have many details until now. So in less than a month we are moving to Athens, Ohio. We are super excited about this new adventure. We moved to Cincinnati a short 7 months ago and I cannot believe we are moving again. While there is a lot to be done to make it all work....finding a house, packing, moving, settling in and finding a new job for myself....I feel I am up for the challenge. For those of you unfamiliar with Athens it is a tiny little college town home to the Ohio University. It should be interesting to say the least I am still trying to wrap my mind around living in a college town not as a college student. I am going to try my best to post my January pinterest challenge results, February's pinterest challenge pick and results....but I am not making any promises! I will be very busy the next couple of weeks!

Thanks for stopping by!

Thursday, February 2, 2012

Coming Soon.....

Hello. I have been busy busy lately. I have been working on some fun things though! So stay tuned for...

-January pinterest challenge result post
-February pinterest challenge pick
-A big announcement
-A pinspiration collage
-Completed handmade gifts!!

I hope you are excited I should be posting in the next few days. Just putting all the final touches on everything. Thanks for stopping by!